A payment page is the one page on your website where a small doubt costs a sale. The client has already decided; they only need to feel sure that they are paying the right amount, to the right business, safely. This checklist is what we work through before any payment page goes live. It is part of our guide to online payments built into your website.
1. Clear options, in the client’s words
Give each payment its own button: “Wedding retainer”, “Remaining balance”, “Engagement session”. Avoid internal labels such as “Invoice type B”. If an amount varies, say where the client will find it, for example “Amount as listed in your contract” or “Amount and due date as shown on your invoice”.
2. Amounts and currency
Show fixed prices on the page and state the currency. A client in Calgary and a client paying from abroad should both know exactly what they are paying.
3. What the payment does
One short sentence under each option: “Your date is reserved as soon as your retainer is received.” It answers the question the client is silently asking.
4. Secure checkout, explained in one line
Clients pay on the provider’s encrypted checkout, so card details never touch your website. Say so plainly on the page. Name the accepted methods: cards, Apple Pay and Google Pay, or GCash, Maya and online banking in the Philippines (see GCash and Maya payments).
5. Receipts both ways
The client should receive a receipt by email straight away, and you should be notified at the same moment. Check what each email says: the payment, amount, date and a reference number.
6. Matching the payment to the booking
Ask for the names and the event date at checkout, or put them on the invoice, so every payment can be matched to the right booking without a follow-up message.
7. Refunds, changes and the contract
One line is enough: “Refunds, date changes and cancellations follow the terms in your signed contract.” Then make sure the contract actually says it.
8. A way to ask before paying
Some clients will want to check an amount first. A visible “Questions about a payment?” link to your contact page keeps them from guessing.
9. Test it as the client, before real money
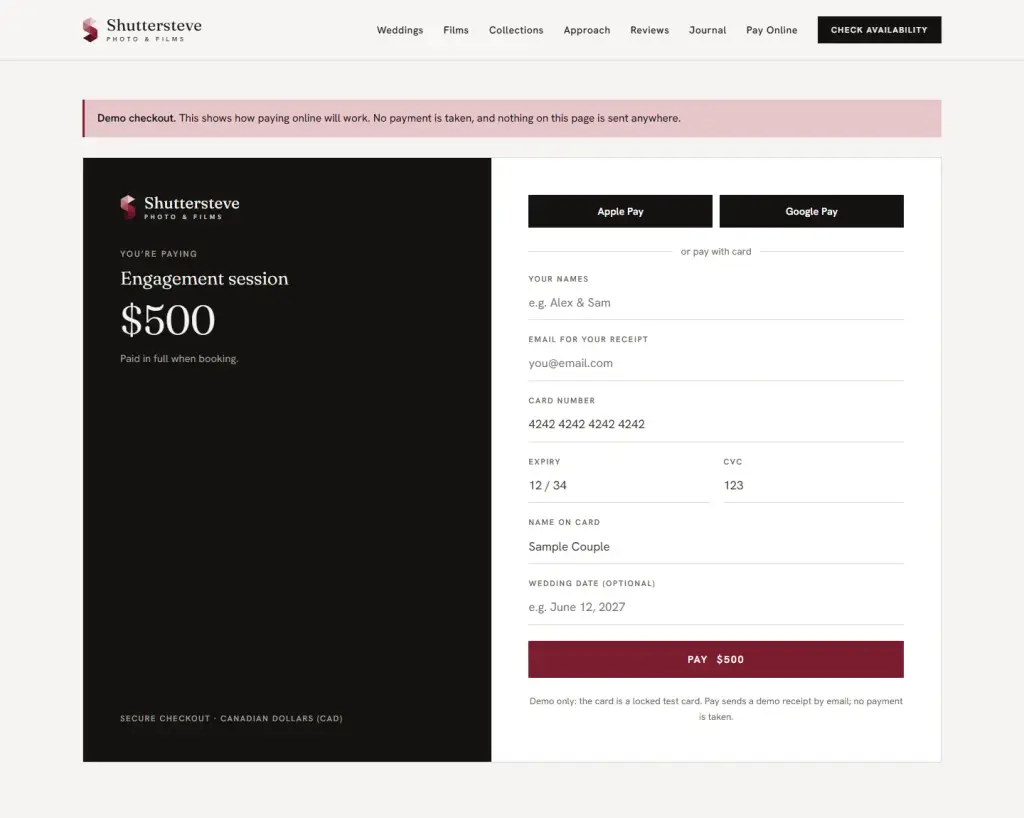
Walk through the whole journey on a phone: choose a payment, check the amount, pay, read both emails. On the Shuttersteve website we did this with a clearly labelled demo checkout that sends the real receipt emails but takes no money, so the studio could see exactly what couples would experience.
10. Accounts in your name
Open the payment account in your own business name, with payouts to your bank. Give your developer access through the provider’s team invitations, never your password.
Before you go live
- Every button opens the right checkout and amount.
- Test emails arrive for both the client and the business, including in spam folders.
- The page works on a phone and on a slow connection.
- The privacy notice mentions online payments.
- In the Philippines, your BIR-registered invoicing is still in place.
Want a payment page that is ready before day one?
We design and test Pay Online pages in your website’s style, with Stripe or PayMongo in your name. See online payments for your website, or compare the options for wedding studios in how wedding photographers can take online payments.